Saturday, 21 January 2012

Let the Zombie Horde Begin - Part 3b Painting begins.

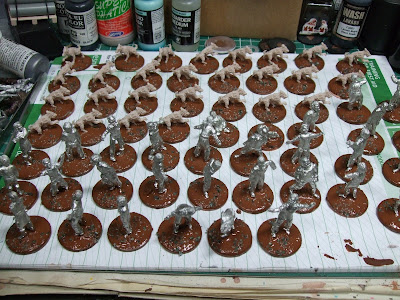
I have managed to get some more work done on the first batch of zombies.. the bases are now done, and more importantly the gore is added and they have had a wash.
So what do you think? 

Gore and bases done! Only varnish left to go!
 The gore was done with three colours of red.. a dark, a middle and a bright red. The burnt cadmium was the dark. Basic Red was the middle and the fresh blood was Game Colour blood. This latter is pretty bright and without a wash over the top, is too bright I think.

I started with burnt cadmium and covered lower edges of wounds and did some blood marks on clothing. I wanted them to look gory but not over done. I think making a figure look bloodied is an art. A lot of people get too heavy with the blood, and they forget dried blood looks almost black. For a first attempt, and with no previous work to go on, I am pretty happy with the look so far.

Close up the bloody and gore and wounds.

More blood and gore.. the light is making the red a little bright.

Those these were cheap figures, the details comes alive with paint on.

The detailing may be softer on VFM figs, compared to others, But you find more as you get painting.

So you can see the group as a whole. The bases were done with my usual three tone system. A dark, a middle and a light. The dark base colour is bases on to completely cover the base. The middle tone goes on with a moderate dry brush. The lighter tine then goes on last with a light brybrush. I chose the grey, as usually I go with brown and I use Silfor Tufts to detail the bases. But I decided the grey worked well and as often these will be in a modern environment, (when I make the buildings, that is! ) I went with grey. Also I think I made do my hero's and survivors with brown bases. That was its easy to tell them apart. But time will tell. 

First 15 zeds ready to roll into the varnish shop!

Zombie Dogs, bases dones the same way.

As you can see I have done the zombie dog bases the same way. I could get some off white and pick out a few individual stones on the bases, to break them up a bit, but give the time and number (still over 100 zombies to go!) its a lot of work. I will see.

The final step will be a gloss coat of varnish as a protective layer. Maybe two coats. As I suspect these figures will get a lot of handling. Then a matt varnish over the top to get rid of the shine!


I see a lot of people using matt only varnish and frankly its a waste of time. Matt varnish will not protect your figure. It will give it a nice flat look and add thin layer, but it is a thin layer. You need a sealing gloss varnish to protect your figures.

Note, the other advantage of doing a gloss layer followed by a matt layer, is as the matt varnish wears away, you will see you figures getting shiny. When that happens, its time for another coat of matt varnish. Before the varnish layer is completely worn away.

Warning - The following may come across a bit patronising!

A tip with varnish. Many people get a white milky look! And scream "nuts" or words to that effect and swear they are not varnishing their figures ever again..

There are a couple of reasons why this happens.;
1). Read the instructions, I don't mean just look at them, I mean follow them. If it says shake the can for 2-3minutes. It means it. Get a watch, and time it. Shake like hell. Your arm and wrist will ache! If they don't you haven't shaken the can enough! The propellant chemicals and adhesives chemicals will not be fully mixed. That means you get cloudy looking finish.

2). Peas - No not the green things you eat. Nearly every good quality can of undercoat, varnish or lacquer has a metal "pea" in the bottom. If the can has stood in the same place un moved for a long time. This gets stuck on the bottom of the can. You need to bang it to free it. This can take a serious clout. Be careful, don't hit it on or with anything sharp or the obvious will happen. But if you don't hear and feel that pea, rattle, then you will never get a proper mix of propellant and varnish. See note 1).  It can take several bangs and some serious hard ones to get the pea loose.

3). Atmospherics. Yes, atmospherics. what??? I hear you scream.. two things.. humidity and dust! Varnishes, don't react well to humidity, spray one in a damp atmosphere, the water vapour in the air sticks too and is trapped in the varnish as it settles on the figures. This gives you a cloudy finish! It also effects the life of the varnish.
Like wise with dust. The fine spray of particulate varnish, is electro statically charged as it turns into an aerosol, as it leaves the can. That charge, makes it attract dust. So try and make sure you spray and leave you figures to dry in a dust free place.  (This is the one thing I struggle with, majorly, its frustrating, but my extrator helps, and with the fumes).

4). Coats, No not 1970s Afghans with furry collars.. ;) I am talking applications and layers. Apply your first coat. Apply it in short bursts, don't apply it too heavy. Work with smooth sweeping motions, don't hover over a single target or you will over dose it! If the coat/layer is too thick! It will go cloudy and look horrid. Better to under - coat it, and apply several thin layers. BUT, ensure its dry between applications. If you put another layer over a curing layer, the chemical reaction of the base layer will effect the second upper coat. The volatiles in the lower layer won't beable to escape, and will effect the second layer!
That leads to a white milky look or can lead to bubbling in the varnish.

5). Too much Matt - Yep, matt varnish, when over applied, goes satin and can even go glossy. It doesn't take a lot of Matt varnish to kill the shine. So make sure you go lightly.
Putting Matt varnish over a gloss when the gloss is not fully dry is another cause of milkyness.

6). Stick to same brand - I personally rate the HMG varnish sold by Figures in Comfort and some other retailers. I like it. It works. I use both the Matt and the Gloss. However if you are tempted to mix manufacturers, heed the following. Different makers, use different combinations and cocktails of chemicals and putting one over another may lead to a variety of issues. Firstly, none setting. Secondly milkyness. Thirdaly peeling in extreme cases. And some cheap chinese varnishes use some pretty horrendous banned chemicals that can react and catch fire, according to an artical in a train magazine, a friend of mine told me about.

So, you are now fully aware, well at least aware of some of the issues that I know of or have come across with varnishes!

Ok, in all scineretly I hope the above is handy and informative!  Despite all that above, it is very much worth varnishing your figures. They will last a lot longer. And there is nothing worse than half way through a game, reaching for a figure, only to notice a chip in your fabulous paint job, which just spoils the enjoyment of the game!

So, anyhow.. that 20 something zombie dogs and 15 human zombies done! (with exception of varnish). To save on varnish I will do them in batches and so these first sets of figures will get put aside and I have to wait for a dry none rainy (humidity) day.

So.. whats next.. I hear the my masses of followers ask in eagernes.. ?? errr. hmm well 15mm sci-fi.. 

Only kidding! My club mates are busily amassing some serious volume of 15mm scifi, from various sources and had a great looking game last week at the club. It looked really good. And yes I would be tempted if I hadn't already got a mass of stuff and my current projects on the go!

So, the next step is to de-mount the figures from the 6" nails they are on and look to getting the next lot mounted and undercoated.

I see VFM have a new set of additions out to their horde range! Going by a post on their blog too. And thus this week I will be following the mantra of " I must not buy more zombies, I must not buy more zombies..!"

Hope you like the look of the ones above. And I will keep you update with the progress of the next lot. I need to get a few more "ordinary, colours". My paint collections are pretty military in nature and I need a few more shades of colours and ideas, before I wind up with too much of one colour in the horde.

Not I have the gore and bases colours sorted out, I hope I can crack on with them.

Please stay tuned for the next update.

Tuesday, 17 January 2012

A quick update..

Hi Folks, Apologies for the lack of updates recently. Life has hit the hetic button once again.
I have however been able to get some painting done on the zombies, batch 1. And they are looking quite good, if I do say so my self. I will try and get some photos up and a full update shortly.

I have also been looking into more storage options for figures. The perenial problem of an expanding lead mountain.. where to put it all!

As an aside and remember I said I wasn't starting any more projects.. well.. err.. it kind of got started last year mind. But I am looking at a fantasy skirmish campaign to run at the club.

I think I have narrowed my idea down to Middle Earth, the 4th age. 500years after the end of the war of the ring or so.. may be a bit longer. Why? Well it means I can write some new stuff, inspired by my MERP info and yet still keep the players familiar with much of the general geography and peoples, without too much change.


Oh and I have been playing with gore! Its actually harder than I thought to make a zombie look good. Seriously.. the drawn, gaunt, mindless expression, are great. But simple paint jobs, lead to simple looks. So to give my victims, sorry zombies some, impact, I experimented with gore.. three tone red combination has kind of worked well. The end result is ok. I would like to say it is awsome, but I just don't know.. I will leave that to you guys to decide once the photos are up.

Anyhow, thats it for now. Just a quick update. More to following shortly.

Thursday, 12 January 2012

Let the Zombie Horde Begin - Part 3a Painting begins.

I thought I would post a quick update on the horde. I managed a little painting over the holidays. Not quite as much as I had hoped, but that always seems to be the way with painting miniatures. You never quite seem to get as many done or quite as far with a figure as you would like in the given time.

Anyhow, here are the latest shots. All of the first two sets of zombie dogs are now painted (excluding bases). I have also started on my first batch of the VFM zombie figures. The first 15 are coming along nicely as I hope you can see.

The first 15 zombies progressing along nicely.
The first 15, still some work to go. But taking shape.

The second set of zombie dogs, the pink ones from Part3, now done.

The other side, I really like the way these came out. Still have the bases to go.

So as you can see they are progressing. The second batch of dogs from Part 3 (the pink ones) are now all looking rather gruesome! The quick dark grey dry brush, with a pick out of the bones has given them a kind of almost burnt / charred flesh look.. grizzly!

Once the first set of 15 zombies are done, I will move onto the basing. The skin tone is looking good on the zombies. I went with stone grey. It is an almost greenish grey without being too green. I aim to give each figure a wash of newton&winsor nut brown ink, before the are done. This will change the tones a little.

I still have the "gore" to do and wounds on on the zombies. Its easy to splash on red paint, but often it looks a little too bright for my taste.. So some experimenting here shall be needed. But so far, so good. Am pleased. I just wish I could get more done faster..lol.

These will definitely not be my finest work. Simple because having so many do to, and they are a "mass" collection, there is no need. I suspect the survivors shall be hosing them down in their hundreds so to speak. But I still want them to look good. I just won't be putting them in the display cabinet.


Right, back to painting I think!

Monday, 9 January 2012

Dice - Ever thought about them.. I mean seriously?

Over the years I have bought lots of dice. I have bags of them. I got some free in games. Some free in give aways. Some I have found on the floor, under the table after role playing sessions.

We all have them, and we all tend to have loads we never really need. Well certainly the role players do. Me included.

Well I watched these two videos.. worth a look.

And


I have to admit i recall looking at a set of sharp edged die and seeing the blemish and just walking away. But I probably shouldn't. As I have to say, I do indeed have some favourite dice. And it is because the do seem to roll well. Conversely i have a friend who has dire luck with dice.

Now I didn't think that these small amounts of edge rounding, difference in size etc could matter that much frankly! But when see quite how much material is taken off the dice in the smoothing process to remove and polish them. You realise how it can easily start to each near 0.5mm! No wonder a lot of my D20's are not the same size. They all started out that way, but depending on how long they get polished for, the sizes alter. And the chances of rolling numbers.

I think this chap sold his business on, since these vids were made. But I am rather tempted to get a set of Game Science dice and see how they perform, compared to my RPG set.


Something for Free! - Basic Fantasy Role Playing

You see a lot of "free" things on the internet here and there. And generally you write them off as cheap promotionals or purely free hooks to get you too take out your wallet to buy something else.

But I am actually a little shocked and a very pleased to be able to say, I have found something quite good. Infact I think it is very good. A free D20 Roleplaying system. It says it is mobified version of 3.5.. now not sure if they mean D&D 3.5ed, or the generic D20 system. Probably the latter.

I decided having found a link on TMP, in a thread about dungeon crawls and "light" rpg games, to flick through and see. And I must say I was impressed.

Having read a lot of free publications on the net. This one is very well done and worth alook if you like D&D and roleplaying games.

http://www.basicfantasy.org/main.html

So, if you enjoy fantasy table top roleplaying. Why not take a quick look.


Friday, 6 January 2012

2012 - A new year of gaming..

Happy New Year - my dear readers. Hope you all had a good holiday season, where-ever upon this earthly globe you happen to be.

So 2012, its here..!

The painting schedule is already behind, given I am 6 days into the new year, it is a little frustrating, to say the least! But hey, I have plenty of time to catch up.

So far, zombie skin tone has been decided upon. Model Colour Stone Grey. Over a white undercoat, comes up nicely. I will do an update as the zombies progress.


Plans for 2012

Having sat down and cast a serious look at my model collection, I have in keeping with the spirit I started this blog in, decided to keep my gaming projects limited. Firstly for monetary reasons and secondly for time and probably just as important at the others. Space, in terms of storage.

So.. in no particular order I plan to continue my slow progress on my Startship Troopers figures. My Vietnam and a fantasy campaign skirmish project that is in the early days of planning.

"So what about the zombies..??" I hear those awake in the front, scream loudly! Well these are my first project of the new year. The others are on hold till the zombies are done! Now the skin tone is chosen, I can crack on. I still have to settle on a rule system, to use for the games I have in mind. AR:SE may not quite cut it, but we will see.

So.. that's the plans for 2012.. and so what did I find my self playing this week at the club.. Future War Commander in 6mm..

Ok, ok,, its not 28mm.. but I have for a while fancied a foray into a smaller or larger scale game, depending upon how you look at it. My regular group at the club have gone heavily into 15mm, to play FWC and Tomorrows War with. Mostly a mix of GZG and cheap toy shop buys. In fact some £1 shops have had an array of VAB type armoured troop carriers, and cheap tanks and sci-fi type flayers. Quite amazing.

Anyhow, the game was great. I won! How I am not quite sure, but it had something to do with me rolling snake eyes, twice during commands. This meant a free extra action for the unit I was issuing orders. In both cases it was my squadron of four red guard tanks. Which were able to pore fire into main cluster of my enemies, AFVs and APCs.. the resulting couple of rounds of firing, tore out his central push, then a luck round of artillery, deviating onto his commander, meant his commander was put out of the fight.

Its a very different rule set that I am generally used to. The fact you cannot be certain, your units will do as you wish, does make you think differently and more strategically. And I can see a certain appeal. I look forward to seeing how my club mates get on with it, in 15mm, as I have usually seen FWC, or Blitzkrieg Commander II or Cold War commander played in 6mm.

But until I can resolve my storage issues, I won't be investing in another scale for now.

So, anyways I have prattled on long enough for tonight. So hope your gaming projects all go as planned and everyone has a good year ahead. I will aim to keep more regular updates here throughout 2012.  So all the best.

Wednesday, 28 December 2011

Let the Zombie Horde Begin - Part 3 Painting begins.

So having based all (or so I thought, see previous post) of my zombies, I went ahead and undercoated a the first batch. I have taken, since doing some Empress moderns, to mounting my figures on 6" nails. I found it easier to hold the model and more comfortable. And more stable as it gives the model more weight. I use hot glue, but have found this can sometimes need re-doing. With these zombies, I have experimented and tabbed a couple down with some white scenery glue. I am hoping the bond, won't be too strong to pop off. And a quick clean up with a razor blade should remove any glue from the nail head and the coin base.

Here are the first set of zombies. I have gone with a white undercoat for now, as I want to try and keep them bright and colourful, or as much as I can. I find black can darken things a little too much. Also the VFM figures don't have vast amounts of deep detailing where leaving black in the recesses can give nice shadows. I am going to be experimenting with skin tones and colours for a bit I suspect. So I decided to get a bit of progress on the zombie dogs.
First batch of zombies to be undercoated.


Having mounted and undercoated what I thought to be all the zombie dogs. I wanted to get a bloody/resident evil type feel to them. So I began with a white undercoat and a simple watery red paint wash. Put on quite heavy. Above and below show how effective the simple one colour scheme can be.

The effect with only a single red paint wash over the undercoat.


Having been quite pleased with that, I decided to give a few a simple brown leather, dry brush, or actually more of a wet brush really. I tend used a done white to pick out a few of the obvious bones, like the shoulder blades, the ribs and leg bones, oh and the eyes. (All vallejo game colours or model colour paints).


I think these are great figures for the price..

Sorry this is a bit dark but you can see the simple effect. I think they look pretty good. I have done 15 in this leather brown/tan type finish. And think I will do some more in a dark grey nearly black and maybe some lighter tan. The three colour schemes should hopefully break up the monotony of the single pose.

White undercoat, red wash, leather brown dry brush, and done white pick out of bones! Simple really!

The zombie bogs.. missing about 13 that managed to some how escape and not get based yet.. grrr!


So there they are,, what do you think?

Tuesday, 27 December 2011

Sneaky zombie dogs.. keep your eyes on them..

Well, there I was admiring my nearly undercoated zombie dogs, and thinking..to myself.. the number didn't seem right.. hmm.. why..?

Because, 13 of them had managed to sneak off the painting table and into a box and avoid being based.. grrrr!


Well, the first zombie dogs are now very red and very evil looking, but not quite the effect I want. I apologies for no photos yet, but more will follow once I have finished playing with colour schemes and I have got the rest of the pack rounded up, stuck down and textured, then undercoated and up to speed with the rest..

So, be warned.. you have to keep an eye on these sneaky zombie dogs!

Tuesday, 20 December 2011

Let the Zombie Horde Begin - Part 2b Basing begins.

Wow.. two updates in one night.. well the first batch of zeds now have textured bases, and are now drying out. So I thought I would show you a couple of shots of their progress.

Zombie dogs with wet basetex paint and fine model railway ballast sprinkled on.
The first batch of Zombies. Done as above.
The first batch in its glory as it sits and dries.
500ml pot of basetex. Prefered as the smaller bottle dry out too quickly.

I simply spatula on the basetex paint using a stiff bristle brush. The lip of the coin bases helps retain the paint, though you do get the odd bit that dribbles over the edge. Load the base up fully. Don't worry as it looses volume as it settles. I use brown alot. Colour wise I have white, brown and dried earth, but I will be painting over the top, so colour makes little difference here to me.

But if you put it on after, well you have a range to pick from. Once the base is loaded up, I sprinkle on some model railways gravel, to give rougher patches and break up the uniformity. As the basetex dries it will seal in most of the gravel. I will rub my thumb over the bases before painting to remove and loose gravel.


A tip. If you decide to try basetex, buy a small bottle, they are acouple of pounds. Give it a whirl. But be prepared for it to dry up. Every small bottle I have had, has dried up within 6 months or so. Even storing them upside down. The reason is, no matter how good you are and tidy, you get paint caught in the lip and threads of the bottles and so it won't seal when closed down.

I thus, buy the 500ml tubs in preference. They last for years. In fact I had one tub for 3 years, before I finished it. And yes it did not dry out. The tubs are made of plastic which the basetex does not properly stick too. You can thus clean up the edge and lid periodically if needed.

Now the consistency of basetex can vary,, some pots come watery and some don't, more like a paste. It is not colour dependant either. I like just thickened enough to flow but not run like water. So if I get pot that's too runny, I leave the lid off for a short period and let it evaporate some of the liquid, or I have also added sand to the brown, to bulk it up. Just ordinary builders sharp sand.

Colour party, make out the particles in the paint that give it, its rough texture are the same colour as the paint. So if it chips you won't see a colour difference if you leave it as its raw colour. The brown certainly if applied in a reasonable layer gives a good "just dried" mud look.

Anyhow.. that's the first batch done! Now only about a hundred more to go!

Let the Zombie Horde Begin - Part 2a Basing begins.

With the horde mostly stuck down with milliput, I started on the epoxy-ing, as a security.
The milliput hold generally well, but one figure did come loose as I lifted it to glue it. So I think the decision to apply some epoxy was wise.

I also stuck down my zombie dogs!  And now the horde is ready to get their bases textured.
This is probably where I differ to many, in that I base and texture my figures before I undercoat and paint. I have never really found the 2pence bases to get into the way of the painting.

A close up of the epoxy applied over the dried milliput as security.
The horde! - My zombie dogs now glued to bases.

So now that the epoxy has set and the fumes have had a day to clear. I can now move onto the next stage of texturing the bases, with basetex paint by Colourparty  

It is nice to see the horde now taking shape. I know I still need to add some "tank" type figures to this lot yet and maybe a few exotics. I will probably get some more detailed figures for those, the VFMs are nice, but they are as my review states, not the "most" detailed and so I would like my players to be able to pick out the nastier/more special zeds during games.

The only problem is, it means a rise in price range of the figures I think and hunting through the likes of Heresy Miniatures' range. But they are not fully required to start with and will be an addition at a later date, when time and funds allow. For now.. its zombies and zombie dogs! 

Monday, 19 December 2011

Let the Zombie Horde Begin - Part 2 Basing begins.

Well I have discovered a couple of things over the last few days.. firstly that you need a decent sized pair of clippers/side cutters to trim off white metal tabs from over a hundred 28mm white metal models, and secondly is milliput goes quite a long way.

I had four tubes of milli put sitting in my painting table draws and eagerly dug them out to get to grips with my planned basing of zombies. But it had all gone hard! Rock hard! I picked most of it up at our clubs Gauntlet Show some years back for £1 each and had used up some on buildings, but even the unopened pack had gone hard. Apparently, keeping it in the freezer, prevents it curing for longer. Same with green stuff.


So it was off to buy a shiny new pack. Now one tip for mixing milli put. Don't just cut off two same sized blobs, push them together and begin trying to mix them together. Its quite hard work and takes a while. A quicker method, is too, cut out your two blobs. Roll each out into a sausage as thin as you can get of same length. Then twist together. Then fold in half and twist together and then repeat. And the just mix by twisting and squeezing. Soon you have a pliable, mono colour blob ready to work with. Also discovered you can use water to smooth it.

Anyhow I spent a couple of hours over two nights, basing up my Victory Force Miniatures' Zombies.


My Victory Force Miniatures 28mm Zombies mounted onto two pence pieces.

You can see most of horde here. I simply rolled out a small roughly 3mm wide piece of milliput and laid across the "tails" side of the two pence coil, as the three feathers decoration provides more texture for the figure to stick too. And I like our Monarchy. :)

Having pushed the milliput down a little with my thumb, I think stuck the miniature into the blob of milliput. Having cut down the slotta tabs, they stood up fairly well. A couple of the miniatures with more animated poses, where they lean forward, had to be propped against some vallejo model paint bottles. Which are just perfect. On some of the models I tried smoothing the edges of the milliput to try and avoid a ridge, when I next apply some epoxy resin and then the basetex texture paint to them. But I was worried about the milliput curing and so just gave up, as the epoxy should help.


The milliput sausages, with figures pushed in. Next step will be the epoxy glue.


So that's it for now. Next step is to leave for a while and let them cure. Then it will be out with the epoxy, just as an insurance policy, as I know the milliput is pretty strong, but I a little blob of two part, across the tab will make me feel better.

My reasoning, is, that unlike many games, with zombies, you tend to pick them up, or place them on the sides, and put on and take off the table, a lot during a game. Far more than you would with say, a WW2 figure. So I want to make these pretty robust.

The next steps coming up are; 1) Epoxy, 2) Basetex paint on the base, 3) Undercoating. I also have a few zombie dogs to glue down to add to this lot. :)

Check back for more progress on the horde shortly!


Thursday, 15 December 2011

More zombies,, this time with a bigger budget..

Well, following on from my previous post today.. there appears to be another zombie film out in 2012.. this time, with a higher budget..

World War Z 


Though this seems to be have faster paced zombies..

Lots of big bangs and even actors I can recognise..

Sudden silence.. appologies..

Apologies. I have not been able to post anything of late, due to a severe lack of progress gaming wise. The run up to the festive holidays has meant I have been a little side tracked with thorny issues such as job hunting.

That aside, I still have progressed basing issue with my zombies. They are now at least washed and dried and just need, a clean up and then milliputing and epoxying to the 2pence pieces.

I was hoping to get some done today, but circumstances have once more conspired against me.

Whilst talking about zombies.. I spotted a reference to this film, someone posted on TMP.


Given it came out in 2010 and I have only just discovered it, and that the rating sites, seem to be floating around about 6 out of ten.. I suspect it won't be a genre leader.. But it does appear to have reverted to the good old shambling type zombies. Hordes and hordes of slow but unceasing undead..

Which I kind of like.. so will be one to see at some stage.. I am sure there will be some gaming ideas to be borrowed from it. More updates to follow..

Sunday, 4 December 2011

Let the Zombie Horde Begin - Part 1 Scrubbing up.

Well hopefully you have read my review of the Victory Force Miniatures.
I bought some during their 50 for $50 deals (review is here ).

I had hoped to make a start on on these sooner but firstly have been faffing whilst I decided which bases to use. I prefer 2pence coins, but they VFM zombies are all tagged for slotta bases. But as my modern troops and everything else I have are on 2pences. I wanted to keep a consistent basing convention.

So its 2pences! Cheap, weighty and stable and readily available all year round.

So, that decision made.. I grabbed some milli put and trimmed down the tag on a couple and stuck them each into a blob of milli put on a 2pence. By trimming the slotta base tag down, it means they don't appear overly tall and are slightly more stable sitting into the milli put.

I usually use 2-part epoxy resin to glue figures down and will probably put some over the central tag to ensure they wont' come away.

So I reached for the first box and arrhhhh nuts!.. Yes, I had forgotten.. I had not washed or trimmed the figures. Oops. At least I had only done two out of the horde so far.

So out with a bowl, in went the figures, a handy splurge of washing up liquid. Fill with hot water. Stir with wooden spoon for a period. Change water. Stir again. Rinse and repeat until water runs clear and bubble free. Then tip out in a sieve and now laid out to dry.


So 100+ figures now drying. Sorry no photos yet. Will post some, once they are progressing. For now. Its waiting for them to dry. Then it will be trimming and cleaning up the flash. Then lots of fun with milli put I think.

I also have some zombie dogs, from the "zombies board game". A friend bought a "bag-o-zombie dogs" and I traded for the excess. I will  also be hunting for some Tank Zombies, and some other special type ones once the horde is progressing.

Sunday, 27 November 2011

Warboot 6 - Emlyn Hall Manchester

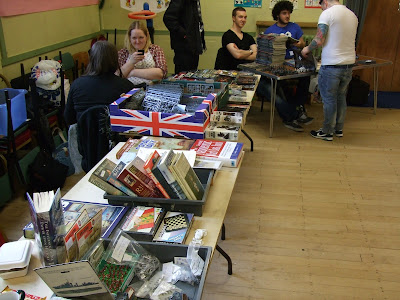
Today a few of us ventured over to Warboot 6 at the Manchester Area Wargames Society, Emlyn Hall in Walkden, Manchester.

The "warboot" series of shows were started a few years ago and take the format of a one day (12pm till 3pm in this case), wargames sales fair, where sellers can book a table for a small fee and sell their wares.

MAWS (Manchester Area Wargames Society) have run these generally at their regular gaming site at the Emlyn Hall. Though some have been run elsewhere, such as the gaming centre in stockport.

Each time I have been to one, I have managed to find some bargains. And it always surprises me, that more people don't drop by to have a look.


Here are some photos;

Warboot 6 - The 40K seemed popular, as these punters proved.

Warboot 6 - A number of second hand games, such as GW Judge Dredd were on offer.

Warboot 6 - This seller had lots and lots of Warhammer Fantasy, sold in singles or units and was happy to do deals.

Warboot 6 - A local shop trader, with range of new bits and pieces. (Sorry forgotten the shop details).

Warboot 6 - There was a mix of historical stuff scattered here and there. One set of 28mm British Boer War figures interested me, but were just out of my funds sadly.

Warboot 6 - One thing I have noted is the increase in sellers selling GW sprues as single pieces. Handy if you wish to do conversions or have managed to miss a part or two.

My total haul for the day was;
Five Artisan WW2 28mm LRDG Figures for £3
A mint copy of Warhammer Fantasy First Ed for £5
Two Foundary Resin Medieval/half timber 28mm Buildings for £2 - Yes that is £2..
And a Front Rank Indian Wars 28mm Wolfes Army Box Set for £30.

The Army box set, has a few missing figures, but appears to have a few extras and totals over 60 miniatures. Not that I promised not to buy another period this year.. dough! And I have to profess to not know if they are all british, or if some french have gotten mixed into them. There are a handful of Indians too. Certainly enough british including Rogers Rangers, to for some skirmish games. Just need to get a few more indians.

So, next time I might have to take a few bits to sell. There was a mix of stuff, but the usual predominance of GW, 40k or Fantasy Battle stuff. And though a couple of sellers did not turn up, there did appear to be a reasonable amount of buying and selling going on. So looking forward to the next one.

In previous years there had been a fair few sellers, selling the AD&D and Horrorclix type plastic prepainted figures, but these sadly were missing. As I was hoping to grab a few bigger bits for some exotic zombies. May be next time.


Saturday, 26 November 2011

Conan and all things Barbarian by Matakishi

http://www.matakishi.com/cromcampaign1.htm

I discovered the Matakishi blog, sometime back around 2008 I think. Directed toward it, due to the articles on building with cork building tiles and his impressive Carentan WW2 layout that he built.

Since then, I have regularly popped by to admire and steal inspiration from his various projects and curse the almost god like production/painting rate, he achieves.

The Crom Campaign, sparked some interest, as a group of fellow club mates are presently playing a fantasy campaign, at skirmish level and it is something I have longed to do. Having done a lot of RGP tabletopping in the past. I have always liked fantasy type generes and have a goodly sized collection of plastic pre-paints. I have also been given a bit biscuit tin full of lead miniatures, from a friend, which were abandoned by a former tennant of theirs.
Mostly grenadier.. now before I embark upon yet another project. I have so far left the tin un-touched. As most need stripping of paint and repainting.


Anyhow I digress. I just wanted to share the above link and generally say I am not jelous at all. Honestly.. not at all.. Not one tiny tiny bit..

Terminators - In 28mm - A little Project.

I came across a link to this battle report at the time, posted on TMP.
Terminators: Cold War Factory Raid


I have been thinking for a while of doing a terminator game. And this enjoyable report and photos got me thinking.

I had a rummage around looking for possible models and general it came down to;

http://www.em4miniatures.com/
and
http://www.copplestonecastings.co.uk/ - Terminator Robots.

I liked both ranges, but chose to get a few from Em-4. A couple of the models were showing as out of stock and a quick email to them, got a swift reply, from Doug, to say he would check as the moulds needed re-doing on a couple. He had a look, but was out of shop stock, but was kind enough to take some out of the show stock. (Cheers Doug).
So having promised, not to deviate from SST and my Vietnam projects. I find my self with a about 20 or so robots to paint. At least my plan is to paint hem very quickly. Black undercoat. Dry brush dark metal. Then light dry brush of shiny metal, the exact shades still to be chosen. Oh and paint some red for the eyes. A recent eBay win, got me a terminator salvation Hunter Killer toy, based on the latest film. Its is a little bigger scale wise than it should be. And is going to prove fun to mount on a flight stand. But it is about as good as I can get.

Rules System wise I plan to use, Arkula's rules as they did in the link. The rules are simple and great for zombie type games.


Sunday, 6 November 2011

Starship Troopers Battle Report AAR - Game 3

This was the third game of Starship Troopers the Miniatures Game we have played.
Again my opponent was my friend Steve. As we are still learning the rules and getting to grips with the game. I came up with a very simple scenario.

The MI had to reach and retrieve a data core from a defunked CHAS unit that had been scouting the area.

The MI force consisted of an LT, three squads and two NCOs. One mounted in an M8 Ape Marauder. (We proxied these with AT-43 UNA figures and a fire toad).

The CHAS is from the SST range and so are all the warrior bugs.
I began with two units of 10 warrior below ground. Three obvious tunnel entrances. Two units of 7 and one of 6 warriors above ground.


The MI deployed from one narrow edge. With a tight deployment zone. They LT was in the centre with one NCO. A squad to his right and two to his left. The M8 was to his right and backed up the first squad. 

The CHAS stranded awaits rescue, well recovery of the data core and then detonation. 

The chas

The swarms begin to move. The MI did not fire in their first turn.  But by turn two they were blazing away. The withering morita fire slices up warriors the first two swarms. 


The MI by turn three had thinned the bugs numbers. But one or two had god close and with reaction kicking in it got brutal. Unfortunately for me, the MI weight of fire did decimate the leading swarms before they could do much more than kill a single trooper. 


Turn four saw the wipe out of my two lead swarms and the third one having emerged from the forrest. The M8's fire power, proved potent, though it took two hits before taking down the last of the third initial swarms. I moved one of my reserve swarms out. And my two burrowing swarms continued their advance. 


The first squad on the right, got too close to a bug hole and my cave-in i had bought cause two casualties.. more than my warriors had achieved so far. The burrowing warriors emerged behind the M8 in an ambush and took the M8 down. Unfortunately I was not quite close enough to get the LT and the NCO, but only just. The LT and NCO readied. The third and second squads were in reaction range and my emerging swarm was slashed with morita and flamer fire and wiped out. But not before i had managed to take down another trooper. The last ten strong warrior unit, having emerged and been spotted was lashed with fire and two rockets in artillery mode the following turn and it was basically all over for me.


I conceded a good victory. The MI had more points worth than me. And I should have been more aggressive with my bigger ten strong units or at least some of them starting out early. The MIs fire power potential is high and the flamers are potent things being squad weapons and thus getting reactions unlike the missile launchers.

It was fun and enlightening. Will be nice once I get my MI build and painted. I need to get more bugs made up so can start to vary the units in the games a little, but whilst we are still getting to grips its not too bad.


Looking forward to the next game.


Tuesday, 1 November 2011

28mm Zombie Miniatures Review by FG

No point in re-inventing the wheel they say. So here is a blog I ran across the other day, when looking at 28mm zombie miniature suppliers and makers.

http://fgminis.blogspot.com/2006/10/modern-day-zombies.html

It is a little dated. 2006. But not too much has changed. Most of the makers mentioned are still about. Though it does not include Victory Force Miniatures I don't think.

Some nice photos and good comparisons.

So worth a look if you feel a zombie outbreak is likley.

Enjoy!

The Horde has grown.

The remainder of the Victory Force Miniatures Zombies I ordered have now arrived. The last lot in record time. The tax man struck on one package alas. But even with the tax it worked out at £1.15 per figure, inc postage and tax etc.

The other packs contained a similar ratio of female to male zombies. I have the odd duplicate, but far less than I was expecting. And I got a free sample figure, which is nice.
I believe it to be a death row prisoner zombie with metal electric chair skull cap!
But i could be wrong. That is how I plan to paint it.

So now is the issue of basing again. 2pence or 1pence pieces? Generally I use 2pence pieces for stability. But the 1pences may allow closer packing. But at the cost of stability.

They also look better when laid down to indicate dead or knocked down figures.


Tuesday, 25 October 2011

Victory Force Miniatures - 28mm Zombie Horde Figure Review

Those who have read my previous post here on the 50 for $50 deal by Victory Force Miniatures will know that I decided to invest in some.

So after an anxious wait, a little box arrived with two bubble wrapped sealed baggies inside. Each containing 25 miniatures and their supplied black plastic slotta bases.

Now the horde deal (which is due to end very soon by the way) is for fifty 28mm white metal zombie figures, for the grand price of $50. Thats about £40 ish with the current exchange rates.

The horde you recieve is not always the same. VFM have abouut 140 or so zombie figures in the range. Some are unique. Others are variants on the same model where arms or legs have been moved or reposed. And you pay for pennies and they pick a random assortment. Meaning you can get some duplicated.
On TMP there was much debate about the level of duplicates. Now I have to say it did not worry me overly. And as you will see from the photos. I don't think I actually got any duplicates. If I did, I have not found them yet..

So to start with. Here are the horde!

Part 1 of the horde 24 male 28mm Zombies

Part 2 of the horde 15 more male 28mm Zombies

Part 3 of the Horde 11 Female 28mm Zombies

As you can see from the three photos above. The pack contained 11 female zombies miniatures and 39 male zombie miniatures. If there are any duplicates I have not spotted them so far. And wouldn't be bothered if I did have a few.

The figures have a range of builds and sizes. Some are obviously variants and do have a similarity to others, but nothing too noticeable. The build of the figures varies, some are slim others more chunky, but are all good fits for the "28mm" category. If you pick your opponent figures from any of the current swathe of makers such as hassle free, EM4, TAG etc I don't think you will find a major disparity.

The casting quality is good. Its not the greatest, as in there is some flash and mould tags that need removing. But frankly I have had much worse from other makers. So given the price. Top marks to VFM so far.

Now onto a few close ups.


VFM 28mm Zombie Female Miniatures
As you can see above. The female figures are easily identifiable. The posing is good. The faces are not the most expressive or detailed, but then they are zombies after all.


Close up of VFM Male Zombie Body Builder
 The figures have an integral stand tag and come with a 25mm round slotta base provided. These also provide a handy scale reference for photos.

This figure stood out when I looked through. Firstly because it is slightly chunkier due to the subject matter. But also has some good detailing. As you can see to its left the other figure is more representative of the majority. With what I would say as a medium level of detail and texture detailing. Now I don't wish that to come across to harsh. We have to keep in mind VFM have obviously set out to make them a "horde" set. I was actually expecting a lower level of detailing when I ordered. So am pleasantly surprised.


Range of poses.
 The above photo was an attempt to show some of the poses in the range. The majority are the a-typical stand up shambler pose. Some have out stretched hands and there is one in the set with no legs or kneeling.

Variety of VFM Zombies
 So the variety of subjects is good. Some are clothed, some partially, some with whole or complete limbs, some missing limbs. Some with very obvious zombie "bite" marks some with far less obvious ones.

In fact if you were nifty with a Green stuff, a few hole fillers and you have some very good civilians or hapless survivors/victims. Something I am considering possibly doing.


Detail close up VFM zombies
 Close up you can see there is some nice room for paint detailing. There are few "hard edges", so dry brushing  will have to be done with care. Every sculptor has their own style and most of the type its faces that stand out. There is a general similarity in many of the figures faces, and this may be from the use of standard dollies and many of the faces are looking upwards. I may tweak a few to lean forward. But that is personal choice. 

So.. if I had to give points out of ten.. One being "I could do better with play-do" and ten being "its too good to go near the gaming table, ever!"  then;

Figure Proportions: 6/10
Figure Variety/Poses: 7/10
Figure Detailing: 5/10
Production Quality: 6/10
Value for money: 9/10


Conclusion - I think as a range of figures. They are good. They are moderately well detailed and their style is definitely in keeping with their purpose. They should fit well with just about any other zombie range figures out there at present.
They are cleanly cast and will not require too long to clean up. There are no separate parts. Which for me is a bonus as they are a horde and that means speed of painting. So less time required for assembly the better.

And value for money! - I think these are about the best you can get. Definitely in white metal. Though with the caveat that this is the last time the 50 for $50 deal is running before a price rise. So hats off to VFM

Monday, 24 October 2011

Victory Force Miniatures - Zombie Horde Deals Ending 31st Oct.

Victory force Miniatures over in the states do a fair few 28mm miniatures. They are a range up until recently I had not even heard of. Then I spotted a post on TMP about some of their figures and the deals they have. And a friend also mentioned them.


Image Copy Right of Victory Force Miniatures


The one most notable to many, is the 50 for $50 Zombie Horde Deal. The zombie range they do has a mix of unique and variants in it. I.e. there are some unique figures, such as the mascot zombies and others, and then there are some general zombie figures with many, be altered to give variants, or slight changes in poses etc.
The net effect is good. The sculpting is good. They are not going to win painting competitions, but frankly when you are buying a zombie horde. Do you really need "a lot" of detail. My personal opinion is no.

However, this is the last 50 for $50 deal they are running before they have to put the price up. Presumably due to the rising costs of white metal, which in recent months has been shooting up in massive jumps, as market forces, mean people moving stocks from banking into commodities.

Any how the net result has been an across the board price rise in the miniatures market for white metal. GW who forecasting must have said prices of metal were due to continue to rise, has stopped metal figures and moved to their fine cast resin. Though this has had mixed results in the market.

VFMs deal means at around the £1:$1.50 ratio we have in currency for the UK, its less than a £1 a figure including their $16 dollar shipping. Which frankly is about the cheapest white metal 28mm prices I have seen in a long time.


I think its refreshing to see a miniatures company, offering this deal. Even  if you run the risk of getting a few duplicates in the mix, as they are picked by the staff out of a "pool" of figs. But by going on the posts of TMP and from friends views who introduced me to them. It appears the number of duplicates varies from zero to 20 or so in the 50. Which to me is perfectly acceptable. Given the saving.

So.. if you are giving some thought to some horror gaming and you want to get a good horde going, then its an offer that frankly only has a short time to run and I would say, is worth a punt.

I will do a review of the figures shortly in more detail. But thought others might wish to share in the deal before it goes.

Friday, 21 October 2011

Fast and Simple Gaming Fun..

Every now and then it is fun to have a change of pace and play a game that is fast and simple!
At the club we have adopted the AR:SE rules on the whole. Akulas rules have been play tested heavily and enjoyed by many over on the Frothers forums.

They are simple. They are inspred by several notable computergames and films and can be had for free! See his blog.

Last night at club, we had a quick game. Werewolves v hurman survivors. A simple and very bloody game, that loosely adhered to Akulas mechanics. I say loosely as we have tinkered and changed the odd thing. More on the fly than any real errors with the rules I might add at this point.

It is just a thing we occasionally do. The net result was four players and one games master, quoting dubious inuendo and film quotes regarding monkeys, whilst laughing our heads off, as our characters died in a plot that wouldn't even make it into a B class movie..  


However it was fast and simple and refreshingly fun. So if you have ever fancy a change of pace, and want something fairly simple. Then check out AR:SE, BAD AR:SE and Total AR:SE.. and give them a go.

Friday, 14 October 2011

Warhammer Historicals - Half Price Sale!..

Yes, I was shocked when I first saw a post on TMP about it. Warhammer Historical were having a sale. Given they are subsidiary of the Games Workshop, who are renown throughout all lands for "never" having a sale. It was quite a shock.

Well some time ago at the Phalanx Wargaming show, My self and Mick bought two model pirate ships complete with crew figures. That being a couple of years ago now, they have sat and never been used.

The other night Mick mentioned he had tried a Warhammer historicals rule set for pirates which included ships combat and so, when the sale was announced I ordered a copy.


Warhammer Historicals - Legends of the High Seas


The book arrived today along with a copy for Mick. Its a nice glossy colour production. Perfect bound and reasonable paper weight. Lots of art work and images. And looks interesting.

There is some history on various pirates of renown etc and reference sheets in the back with some templates etc.

I will do a fuller review at a later date. Once I have had a chance to read through it. But I am told it is loosely based upon the Lord of the Ring system which I believe GW have since dropped.

The Warhammer Historicals wild west are apparently also a derivative of this LOTR set too.
So, will post some views and reviews once we get a game or two on the way.

And of course, in the meantime. Their half price sale is continuing. Bringing their usually higher than average prices down to more average market levels.

Monday, 10 October 2011

Injury and Ebay - Preventing progress.

Hi Folks, Firstly apologies for the lack of progress. But a colision between an axe and my thumb has left me with a extremely badly bruised thumb, which had gone a lovely colour of blue/grey/purple and hurts like hell. Thus I am blaming this for the lack of progress of late.. hey, we all have to have our excuses.

Seriously though. I am hoping to get a little bit done this week if I can. And will post some progress shots as I go.


Ebay - that lovely world of crazy! I have been hunting down the odd bit here and there, and spotted some SST figures I fancied. I was about to bid when the price shot up. To £103.99 for three figure!

This is not the first time either. In recent times, I have seen SST figures reach what I frankly believe to be obscene values. I have happily paid reasonably high prices for some in the past and some might argue that the figures I have paid, were too high. But even I have my limits (apart from the obvious lack of cash as it were).

So if you have some SST figures that you don't wish to hang onto, it seem the market is rich at the moment. I suspect a fall off in prices will occur, as seems the general trends with such things. So it may be time to jump in with the bits you don't need sooner than later.

I will be checking to see if I have some spares in my collections later.