Tuesday, 20 December 2011

Let the Zombie Horde Begin - Part 2b Basing begins.

Wow.. two updates in one night.. well the first batch of zeds now have textured bases, and are now drying out. So I thought I would show you a couple of shots of their progress.

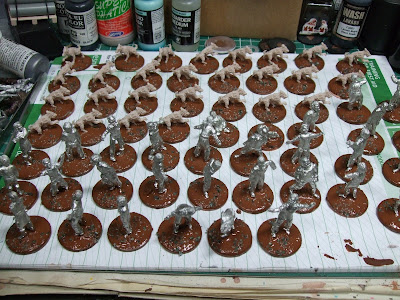
Zombie dogs with wet basetex paint and fine model railway ballast sprinkled on.
The first batch of Zombies. Done as above.
The first batch in its glory as it sits and dries.
500ml pot of basetex. Prefered as the smaller bottle dry out too quickly.

I simply spatula on the basetex paint using a stiff bristle brush. The lip of the coin bases helps retain the paint, though you do get the odd bit that dribbles over the edge. Load the base up fully. Don't worry as it looses volume as it settles. I use brown alot. Colour wise I have white, brown and dried earth, but I will be painting over the top, so colour makes little difference here to me.

But if you put it on after, well you have a range to pick from. Once the base is loaded up, I sprinkle on some model railways gravel, to give rougher patches and break up the uniformity. As the basetex dries it will seal in most of the gravel. I will rub my thumb over the bases before painting to remove and loose gravel.


A tip. If you decide to try basetex, buy a small bottle, they are acouple of pounds. Give it a whirl. But be prepared for it to dry up. Every small bottle I have had, has dried up within 6 months or so. Even storing them upside down. The reason is, no matter how good you are and tidy, you get paint caught in the lip and threads of the bottles and so it won't seal when closed down.

I thus, buy the 500ml tubs in preference. They last for years. In fact I had one tub for 3 years, before I finished it. And yes it did not dry out. The tubs are made of plastic which the basetex does not properly stick too. You can thus clean up the edge and lid periodically if needed.

Now the consistency of basetex can vary,, some pots come watery and some don't, more like a paste. It is not colour dependant either. I like just thickened enough to flow but not run like water. So if I get pot that's too runny, I leave the lid off for a short period and let it evaporate some of the liquid, or I have also added sand to the brown, to bulk it up. Just ordinary builders sharp sand.

Colour party, make out the particles in the paint that give it, its rough texture are the same colour as the paint. So if it chips you won't see a colour difference if you leave it as its raw colour. The brown certainly if applied in a reasonable layer gives a good "just dried" mud look.

Anyhow.. that's the first batch done! Now only about a hundred more to go!

Let the Zombie Horde Begin - Part 2a Basing begins.

With the horde mostly stuck down with milliput, I started on the epoxy-ing, as a security.
The milliput hold generally well, but one figure did come loose as I lifted it to glue it. So I think the decision to apply some epoxy was wise.

I also stuck down my zombie dogs!  And now the horde is ready to get their bases textured.
This is probably where I differ to many, in that I base and texture my figures before I undercoat and paint. I have never really found the 2pence bases to get into the way of the painting.

A close up of the epoxy applied over the dried milliput as security.
The horde! - My zombie dogs now glued to bases.

So now that the epoxy has set and the fumes have had a day to clear. I can now move onto the next stage of texturing the bases, with basetex paint by Colourparty  

It is nice to see the horde now taking shape. I know I still need to add some "tank" type figures to this lot yet and maybe a few exotics. I will probably get some more detailed figures for those, the VFMs are nice, but they are as my review states, not the "most" detailed and so I would like my players to be able to pick out the nastier/more special zeds during games.

The only problem is, it means a rise in price range of the figures I think and hunting through the likes of Heresy Miniatures' range. But they are not fully required to start with and will be an addition at a later date, when time and funds allow. For now.. its zombies and zombie dogs! 

Monday, 19 December 2011

Let the Zombie Horde Begin - Part 2 Basing begins.

Well I have discovered a couple of things over the last few days.. firstly that you need a decent sized pair of clippers/side cutters to trim off white metal tabs from over a hundred 28mm white metal models, and secondly is milliput goes quite a long way.

I had four tubes of milli put sitting in my painting table draws and eagerly dug them out to get to grips with my planned basing of zombies. But it had all gone hard! Rock hard! I picked most of it up at our clubs Gauntlet Show some years back for £1 each and had used up some on buildings, but even the unopened pack had gone hard. Apparently, keeping it in the freezer, prevents it curing for longer. Same with green stuff.


So it was off to buy a shiny new pack. Now one tip for mixing milli put. Don't just cut off two same sized blobs, push them together and begin trying to mix them together. Its quite hard work and takes a while. A quicker method, is too, cut out your two blobs. Roll each out into a sausage as thin as you can get of same length. Then twist together. Then fold in half and twist together and then repeat. And the just mix by twisting and squeezing. Soon you have a pliable, mono colour blob ready to work with. Also discovered you can use water to smooth it.

Anyhow I spent a couple of hours over two nights, basing up my Victory Force Miniatures' Zombies.


My Victory Force Miniatures 28mm Zombies mounted onto two pence pieces.

You can see most of horde here. I simply rolled out a small roughly 3mm wide piece of milliput and laid across the "tails" side of the two pence coil, as the three feathers decoration provides more texture for the figure to stick too. And I like our Monarchy. :)

Having pushed the milliput down a little with my thumb, I think stuck the miniature into the blob of milliput. Having cut down the slotta tabs, they stood up fairly well. A couple of the miniatures with more animated poses, where they lean forward, had to be propped against some vallejo model paint bottles. Which are just perfect. On some of the models I tried smoothing the edges of the milliput to try and avoid a ridge, when I next apply some epoxy resin and then the basetex texture paint to them. But I was worried about the milliput curing and so just gave up, as the epoxy should help.


The milliput sausages, with figures pushed in. Next step will be the epoxy glue.


So that's it for now. Next step is to leave for a while and let them cure. Then it will be out with the epoxy, just as an insurance policy, as I know the milliput is pretty strong, but I a little blob of two part, across the tab will make me feel better.

My reasoning, is, that unlike many games, with zombies, you tend to pick them up, or place them on the sides, and put on and take off the table, a lot during a game. Far more than you would with say, a WW2 figure. So I want to make these pretty robust.

The next steps coming up are; 1) Epoxy, 2) Basetex paint on the base, 3) Undercoating. I also have a few zombie dogs to glue down to add to this lot. :)

Check back for more progress on the horde shortly!